

Why I choose NiSi Filters?
I have been doing travel and landscape photography most of my adult and adolescent life. For 5 years it has been my main profession travelling in Iceland and enjoying the diverse and unique landscape and capturing it for others to enjoy. These last 2 years have brought me to new countries, new playgrounds as I see it. I´ve shaped my style, it is both dynamic and dramatic. This requires me sometimes to use filters. I like to do long exposures, I like my clouds to be visible and colourful if there are any colors and I like to be able to reduce glare and “pop” colours with my polarizer.
There are of course a lot of Filter brands out there and to be completely honest I find most of them useless. I lead Photo tours and Workshops and of course I see participants bring all kinds of gear with them. I´ve seen them with great gear, expensive cameras and good lenses but putting on cheap filters, variable ND´s, and other crappy stuff (pardon my english) … the truth is you might as well shoot through a tinted car window… the cheap stuff doesn’t give the right touch and it can even have damaging effect.
Of Course quality stuff is more expensive, but think about this: you buy a camera for x-thousands of dollars, you get quality lens which cost a small fortune and then you put a low quality glass in front of everything! It just does not make any sense. You degrade all your equipment instantly.
For a long time I used Lee filters, the decision was made originally because Lee was the only quality filters available in stores in Iceland. That´s just the way it was.
Lee filters are good stuff compared to many other manufacturers. The quality of the glass was not bad, however the colour cast was awful, which was mostly correctable in post, except maybe for the 10 stop, it had just too much cast and even after post I was never happy. Plus the fact that the gradient filters are made from plastic (resin) and not glass.
The good thing about Resin filters is they are strong and do not scratch easily, but they are less quality and often they are difficult to clean on the field. Having said all that I have a lot of great photos in my portfolio taken with Lee filters… and Lee is NOT one of those “useless brands” I mention earlier, but Lee has a few issues at the moment.
It is a bit of a commitment to change brands because you are always a bit invested in a particular brand… and it was not until I needed to buy a polarizer and a holder for my 100×100 Lee system that I found that theprice tag for it was similar to a NiSi V5 Pro 100mm filter holder kit, which contains the holder, polarizer, 67mm, 72mm, 77mm, adapter rings and a 82 main adapter ring. With NiSi the holder is aluminium, not plastic and the polarizer is brilliantly incorporated into the holder. There were originally some issues with the holder being too tight for the filters, but it’s fixed now and hasn’t affected me at all. The NiSi kit also comes with a nice leather holster which is great as I’m always on the go. For me to get all that for the same amount as one polarizer from Lee was a no brainer… I had already borrowed and tested NiSi from a friend so I knew they were good. I have tested the NiSi filters quite extensively this summer and I can honestly say it is the best quality filters I have tried so far.

NISI V5 FILTER HOLDER KIT
Of course nothing is perfect and I can see on the polarizer there is a slight warm cast, but it is nothing to be concerned about. I can’t see any cast on the ND’s. The optical quality of the glass is amazing, I am not losing any sharpness.
One advice I can give you, because I´ve seen people doing it: you should not put more glass in front of your lens than you absolutely need. This is important… I have heard things like “you should always keep your polarizer on… it helps when it helps, but it never does harm”. This statement is just nonsense! You should know what you want to achieve when you use filters and only use enough to achieve it.
HERE IS A LITTLE EXAMPLE ON HOW I USE MY NISI FILTERS:
Not long ago I was shooting with a group at Sigöldugljúfur (Aka Valley of Tears) in the Highlands of Iceland. Beautiful place and a perfect spot to demonstrate the use of Filters.
FIRST I LOOKED FOR MY COMPOSITION WITHOUT FILTERS AND THIS IS WHAT I GOT:
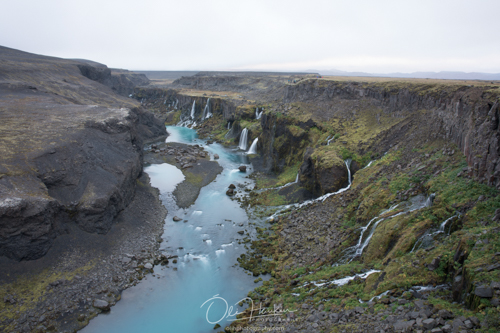
Looks ok, but there is a glare on the water which makes it look a little dull and it does not have the vivid deep color I saw with my own eyes standing on the edge. I knew what I wanted, I wanted a little slower shutter, but still not to much. The NiSi polarizer should take care of both, remove the glare and give me an extra 1-1,5 stop for longer shutter speed.
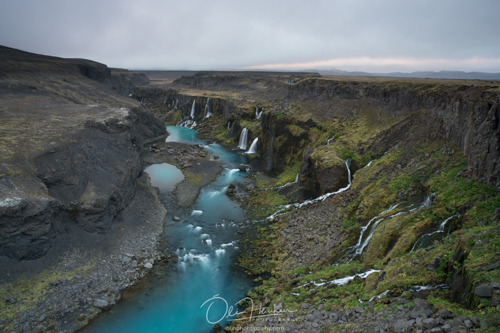
WITH THE POLARIZER IT LOOKED LIKE THIS:

The glare is completely gone, the color of the river is the same as I saw it and the water is a little smoother due to slower shutter. I like to expose a little to the left in my histogram because the image will have more “data”, so you have more latitude in post. In real life it was a little bit darker standing there but I like to darken it in post rather than underexpose and loose data. Now everything in the photo looks right… except the sky… My histogram showed highlight clipping and the sky was actually much darker and more dramatic… there was even some color but it does not show on this photo. There are a few things I can do to fix that: either exposing once for the ground and once for the sky, doing a HDR or use a filter. I had to choose one of those options because highlight clipping sucks! It means there are areas in the photo so white it does not contain any data and if you just darken it in post it will look gray and ugly… in short, it’s only good for the trash. To fix the sky I decided to use the NiSi 3 stop soft grad. The hard or medium grad could also be used but that would risk darkening areas on the ground. I normally try to make the graduated filter invisible… soft grad has a long gradient and I don’t use it to get the sky as dark as I want in camera, because usually I don’t like the outcome if I do, so I only use it until I see on my histogram my highlights are not clipping anymore. The rest I do in post.
SO HERE IS THE PHOTO WITH THE POLARIZER AND 3 STOP SOFT GRAD:
The clouds have structure, there´s color and most importantly; no highlight clipping. You can see to the left that the top of the mountain is a little darker but it isn’t too heavy, and it is easily fixed in post
FINALLY WITH MY RIVER COLOR AND THE TEXTURE I WANTED, EXPOSURE I LIKE BOTH FOR THE SKY AND GROUND I DID MY THING IN PHOTOSHOP AND THE RESULT IS THIS:
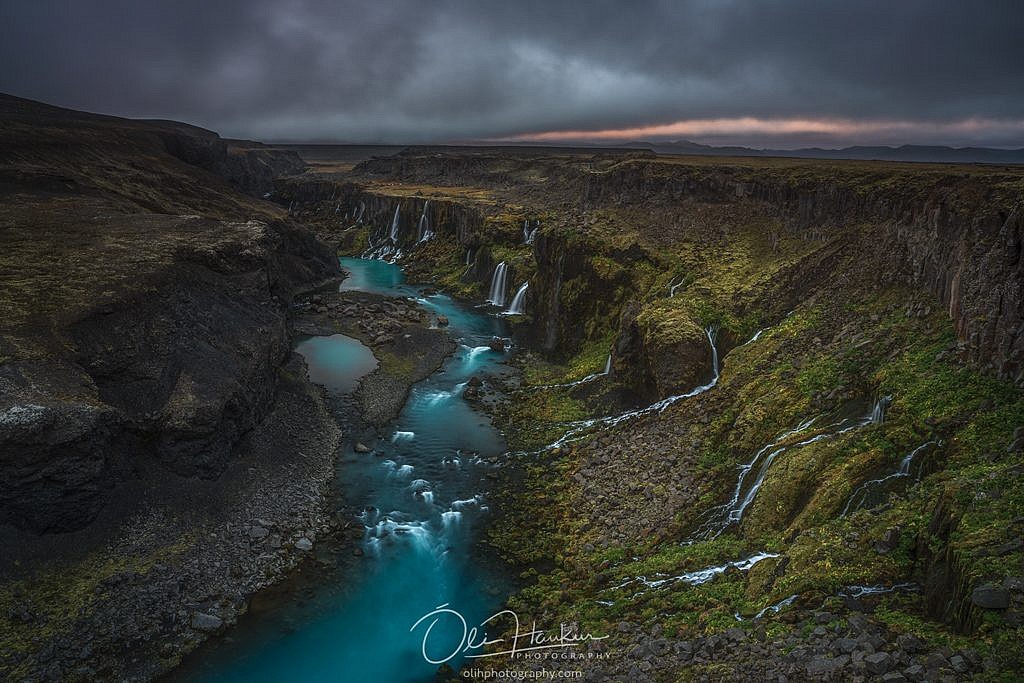
Final Image
Dark and dramatic like this morning really was… sun trying it’s best to break through the clouds but failing, nothing made up, just enhanced and corrected with the use of filters and a little post… mostly just darkening.